
The best defence against nesting birds under solar panels is a full-perimeter mesh skirt, made from stainless steel or PVC-coated wire, fitted with specialist non-invasive clips rather than screws or adhesive. Spikes and ultrasonic deterrents can help around chimneys or gutters, but they are not reliable enough to use alone under a panel array. Fit the mesh at installation or in early spring, before nesting season starts, and never disturb a nest once birds are sitting.
- Mesh skirts with clip fixings are the primary, proven solution
- Spikes and ultrasonic devices work only as backup measures
- Check for active nests before you touch anything, and act early in the year if you can
Pro tip: If you already hear scratching or chirping under a panel, stop and check the calendar before you do anything else. Disturbing an active nest is an offence under the Wildlife and Countryside Act 1981, and it applies to pigeons and sparrows just as much as anything rarer.
Key takeaways
Clip-fixed stainless or PVC-coated mesh, fitted around the full panel perimeter with a kick-out flange, is the only bird proofing method proven to stop nesting reliably under UK conditions.
| Point | Details |
|---|---|
| Mesh is the standard | Full-perimeter stainless or PVC-coated mesh outperforms spikes and ultrasonics for stopping nesting. |
| Timing matters legally | Fit before nesting season or once nests are confirmed inactive, disturbing active nests breaks the law. |
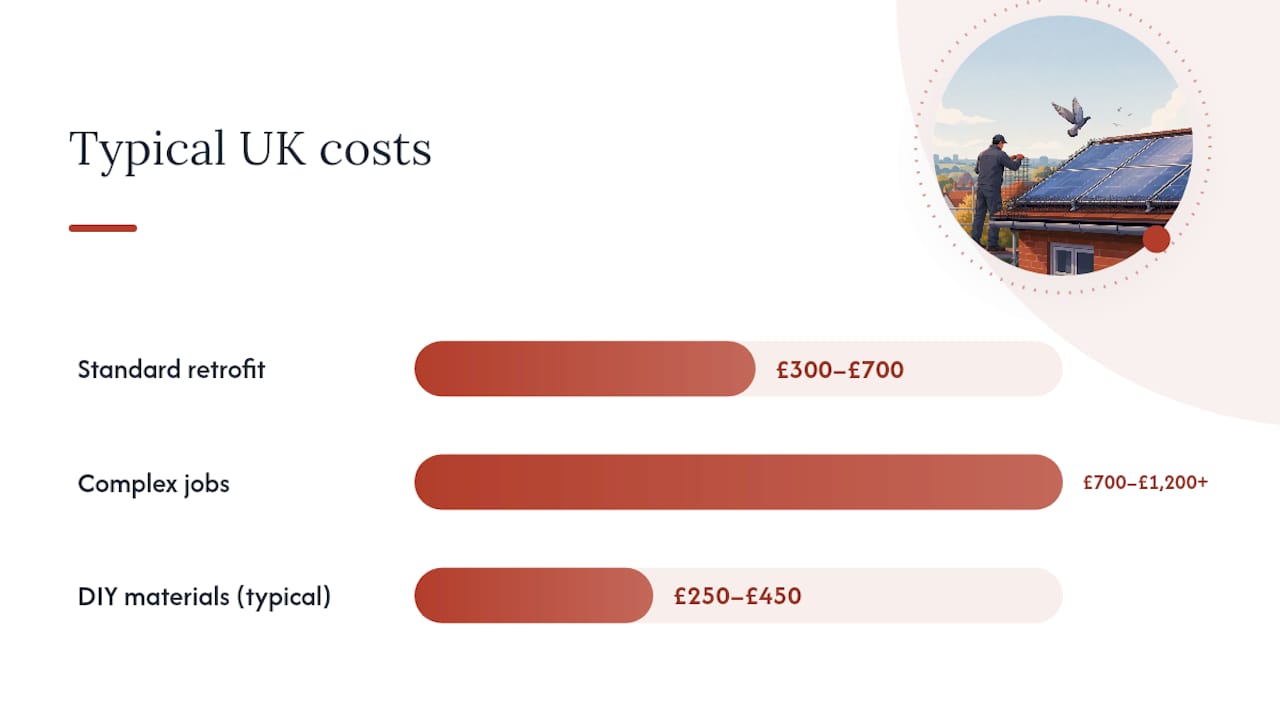
| Costs scale with complexity | Professional fits run £300 to £700 typically, rising to £700 to £1,200+ for scaffolding or nest clearance jobs. |
| Fixing method protects warranties | Clip-based, non-drilling attachment preserves panel warranties; screws and adhesives risk voiding them. |
| Smart Home Technical fits full-perimeter mesh | Surveys access and wiring first, then fits clip-based mesh with a kick-out flange across Dorset, Hampshire and Devon. |
Table of Contents
- What is the best bird proofing method for solar panels?
- How much does bird proofing solar panels cost in the UK?
- Should you fit bird mesh yourself or hire a professional?
- How Smart Home Technical fits bird mesh on solar arrays
- What should you check before hiring a bird proofing installer?
- Sources
What is the best bird proofing method for solar panels?
Mesh wins because it solves the actual problem: the 30 to 100mm gap between the roof tiles and the underside of the panel that birds treat as a ready-made nesting cavity. Once they’re in, pigeon droppings corrode wiring, soiling shades cells, and localised heat build-up creates hot spots that quietly drag down output long before you notice anything on your generation app.
A properly fitted mesh perimeter closes that gap entirely while still letting air circulate underneath, which matters because panels need that airflow to run efficiently. The standard material is galvanised or PVC-coated stainless steel mesh, clipped rather than drilled or glued into place around every edge of the array, not just the exposed sides.
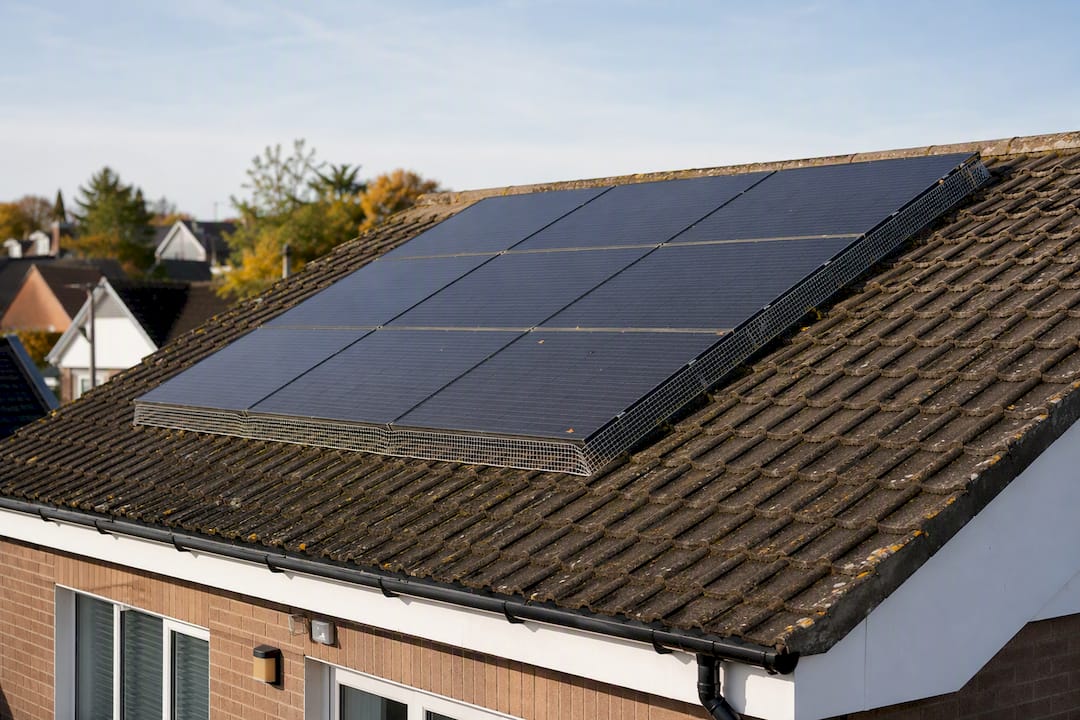
Brush strips and rigid perimeter guards have their place. They install faster and cost less upfront, which suits smaller jobs or awkward roof shapes where a continuous mesh run isn’t practical. The trade off is longevity: bristles flatten, and rigid guards can warp or gap over time in a way that mesh, correctly tensioned, doesn’t.
Spikes, reflective strips and ultrasonic boxes sit firmly in the “supplementary” category. Determined pigeons walk straight past spikes, and ultrasonic devices lose effectiveness within days as birds habituate to the sound. Use them around adjacent roof features, not as your only barrier under the panels themselves.
- Mesh: best long-term coverage, resists UK weather, needs a proper fit to earn its keep
- Brushes and rigid guards: quick and cheap, but shorter working life
- Spikes and ultrasonics: fine as extras, weak as a standalone solution
UK weather is the real test. Coastal salt air and freeze-thaw cycles degrade cheap galvanised mesh faster than PVC-coated stainless, so the slightly higher upfront material cost tends to pay for itself over a decade rather than a season.
How much does bird proofing solar panels cost in the UK?
Professional retrofits typically run £300 to £700 for a standard domestic array, rising to £700 or more for complex jobs involving scaffolding, steep pitches, or careful clearance of an existing nest site. DIY kits cost roughly £30 to £60 per linear metre of mesh, so a typical ten-panel array might need £250 to £450 in materials alone before you factor in your own time and any access equipment.
- Standard domestic retrofit: £300 to £700 professionally fitted
- Complex jobs (scaffolding, steep roofs, nest removal): £700 to £1,200+
- DIY materials only: £30 to £60 per linear metre
Timing matters as much as budget. Fit mesh during the original solar installation if you can, since the panels are already off and access is simplest. If you’re retrofitting an existing array, early spring, before birds start scouting nest sites, is the safest window. If nests are already active, the job waits until the chicks have fledged and the site is genuinely vacant.
Weigh the install cost against the alternative. Left unchecked, fouling and nest debris shade cells and cause hot spots that cut string output, and repeated cleaning visits or a wiring repair after guano corrosion will usually cost more over a few years than one proper mesh fit.
Should you fit bird mesh yourself or hire a professional?
DIY mesh can work for confident homeowners with a low-pitch, single-storey roof and easy ladder access. The risks are real: screws, adhesives or cable ties are the most common DIY mistakes, and any of them can puncture a panel frame, void a warranty, or leave a gap a determined pigeon exploits within a week.
- Check your roof pitch and access before deciding, steep or high roofs need a professional with proper fall protection
- Never work near live DC wiring under panels unless you know exactly what you’re touching
- Use clip-based fixings only, non-invasive clips are designed to attach without drilling or adhesives and stay compatible with panel warranties when fitted correctly
- Confirm no birds are nesting before you start any work on the array
Bird damage left unprotected can itself be grounds for a warranty dispute, so the mesh isn’t just pest control, it’s part of protecting the manufacturer’s guarantee on the panels themselves.
If you find an active nest partway through a job, stop. The Wildlife and Countryside Act 1981 makes disturbing it an offence, and the only sensible move is to wait it out and call a qualified installer once the site is clear.
How Smart Home Technical fits bird mesh on solar arrays
Every job starts with a proper survey rather than a guess from ground level. We check roof access, measure the actual gap under the panels, look for existing debris or old nesting material, and inspect wiring condition before any mesh goes near the roof.
On the fit itself, we use clip-based stainless or PVC-coated mesh around the full perimeter, not just the visible front edge, since gaps at the sides and rear are exactly where birds get in unnoticed. We bend the bottom 25mm of mesh outward into a “kick-out” flange under slight tension, which stops birds levering a gap open at corners or roof valleys, a detail that’s easy to skip and the first thing that fails if it’s missed.
- Full site survey before any mesh is ordered or cut
- Clip fixings only, no drilling into panel frames or roof tiles
- Kick-out flange fitted along the entire bottom edge, not just the corners
Pro tip: Ask to see the kick-out flange on any quote you’re given. If an installer doesn’t mention it, ask why, it’s a small detail that separates a mesh job that lasts from one that needs redoing in two years.
We fit mesh during new installs across Dorset, Hampshire and Devon as standard, and offer it as a retrofit service for existing arrays, including cases where a nest needs to be assessed and cleared safely once inactive.
What should you check before hiring a bird proofing installer?
Get these answers before you sign anything.
- Confirm the fixing method is clip-based, not screwed or glued into the panel frame or roof tiles
- Ask for photos of previous full-perimeter installs, not just the front edge shown in a sales brochure
- Check the installer carries liability insurance and, ideally, relevant trade membership or credentials
- Ask directly how they handle a nest found mid-job, a professional pauses and waits, they don’t clear it there and then
- Get written confirmation the work won’t affect your panel warranty
Pro tip: A documented handover with photos of the clips and full-perimeter coverage protects you if you ever need to make a warranty claim later, so ask for this as standard, not as an extra.
Walk away from anyone proposing adhesive fixes, screws through the frame, or mesh that only covers the front edge. Partial coverage is worse than it sounds, because birds simply move to the uncovered side and you’ve paid for a job that doesn’t actually solve the problem.
Why mesh remains the standard we recommend
Prevention beats repair every time we’ve seen it play out. A mesh perimeter fitted properly, with full coverage and a decent kick-out flange, means fewer callouts for cleaning, fewer wiring faults from guano corrosion, and a warranty that stays intact because nothing’s been drilled into the frame. It’s the quiet, unglamorous fix that saves homeowners the expensive surprises later.
— Simon
Get your solar array assessed for bird proofing
There are DIY kits and generic pest-control call-outs out there, but neither gives you a proper survey of your specific roof, your panel warranty terms, and the gaps birds are actually using. Smart Home Technical is the practical alternative for homeowners across Dorset, Hampshire and Devon who want it done once, done properly, and documented.
A typical quote includes a site survey, clip-fixed mesh around the full perimeter, clearance of any existing debris, and a photo record of the finished job for your own records or a future warranty claim. Because every roof and array is different, we price after seeing the actual gap and access, not off a generic rate card. If your panels are exposed and unprotected, request a site survey or quote through our solar installations page and we’ll tell you exactly what’s needed before any work starts.
Sources
- Bird Proofing Solar Panels UK: What Works
- Wildlife and Countryside Act 1981
- Professional bird protection solar panels | PV Protector®
Recommended
- Why solar panels need cleaning: a UK homeowner’s guide – Smart Home Technical Ltd
- Solar panel aerial interference Dorset: what you need to know – Smart Home Technical Ltd
- How solar reduces your household bills: a homeowner’s guide – Smart Home Technical Ltd
- Why solar suits coastal homes: a UK homeowner’s guide – Smart Home Technical Ltd
